
After my Kenwood TS-2000 blown the display lamps ( it was only 3 of 6 blown) I decide to make the "Cool Blue LED modification" by my own without purcase the high priced kit from Internet.
At this point I have to say that Ham Radio is SHARING of infromation and no BUSSINESS. The cost for the "kit" is 35 USD and the whole modification it cost me only 6 Euro as the LEDs and resistors cost. (about 9 USD)
Here is the modification:
When you open the radio cover removing the 10 screws remove the upper screws that they keep the panel in place. Lose some the lower two screws and gently leave the panel to come upsidedown in front of you.
In that position free the ribbon from radio side carefully..!!!
Remove the two plugs at the left side to be seperated from the radio body.
Now you can have the front panel free to work...

Now carefully remove all knobs from the face of control panel starting with Dial knob....

and then the smaller ones...

...now you can lose the clips tha hold the plastic surface of control panel on the metal frame-base....
Four screws hold the display on the metal frame. Free the display and prepare for the soldering work on it...

Six small lamps is used by the Kenwood to give the illumintion to display. With a small cutter carefully cut the legs of this lamps and take them out of the holes. Remove also the 3 SMD resistors ....

I use 3 resistors of 150 ohm (Brown-Green-Brown) for the LED polarization. Prepare the LEDs cuting their legs and leaving 4mm for the soldering point. Be carefull with polarization. The anode goes to te resistor side.
Finish first with resistors soldering and then make the LEDs soldering. Use soldering iron that is for SMD work.
The area you work is sensitive due to small components but is easy if you know how to do it.

A closer view with components on ....

Don't be harry at this phase. Double check the LED polarity. Take your time. Any mistake will put you back at the beggining again.... After the soldering work is time to reassemble the parts again... Put the display back and tight the 4 scews that hold it on metal base.... Check if is enough space between LED legs an metal...any shortcut is....unwanted hi hi...


Put all back carefully....


Put the ribbon cable and two plugs on place and reassemble the front panel on the radio body. Double optical check at any step...!!! Do not push too much the ribbon cable. !!!
Put all knobs on their place and close the radio again puting back the 10 screws.

You are finished..... NOW is the time of trouth....
Plug your radio on 12 volts and turn it ON....!!!
and.... V O I L A....


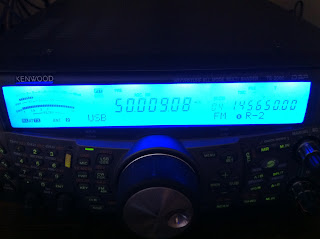


Here is how my radio looks after the modification that cost me only 6 Euros....!!! and no 35 USD....!!!
If you want to try it, is on your own risk.
73s de SV5BYR
It is rather usual for hams around the globe to invest on a "ready to assemble" kit rather than doing their own research to obtain best value for money.
ReplyDeleteBoth ways are quite acceptable, though, as long as they actually grab the soldering iron and make the mod themselves.
Paying somebody else to "mod" their "black box" while having no intention to learn anything about what exactly happens inside is the "trend" that actually hurts the spirit of amateur radio.
Of course, making your own research allows you to save 29 USD to invest on parts for another project, money that are better spent this way rather than making some "for profit" guy richer by that amount.
Congratulations on an excellent job.
73 de SV9OFO
100%
DeleteΕκτός από την αποφυγή της κοροιδίας το μεγαλύτερο κέρδος είναι η τεχνογνωσία που μένει μετά την επιτυχία ώς εμπειρία...
ReplyDeleteΝασαι καλά Γιάννη.
73
christian louboutin outlet
ReplyDeletebalenciaga sneakers
supreme clothing
supreme
curry shoes
converse shoes
moncler
nike lebron 15
adidas ultra boost
converse outlet
Well done. Thank you for sharing your great upgrade work.
ReplyDeleteegnr69jh5
ReplyDeletegolden goose outlet
golden goose outlet
golden goose outlet
golden goose outlet
golden goose outlet
golden goose outlet
golden goose outlet
golden goose outlet
golden goose outlet
golden goose outlet